In order to produce high-quality images, it is important to understand how the pixel data of images is measured and displayed.
Pixel dimensions
For example, a 15-inch monitor typically displays 800 pixels horizontally and 600 vertically. An image with dimensions of 800 pixels by 600 pixels would fill this small screen. On a larger monitor with an 800-by-600-pixel setting, the same image (with 800-by-600-pixel dimensions) would still fill the screen, but each pixel would appear larger. Changing the setting of this larger monitor to 1024-by-768 pixels would display the image at a smaller size, occupying only part of the screen.
When preparing an image for online display (for example, a Web page that will be viewed on a variety of monitors), pixel dimensions become especially important. Because your image may be viewed on a 15-inch monitor, you may want to limit the size of your image to 800-by-600 pixels to allow room for the Web browser window controls.

Example of an image displayed on monitors of various sizes and resolutions
Image resolution
The number of pixels displayed per unit of printed length in an image, usually measured in pixels per inch (ppi). In Photoshop, you can change the resolution of an image; in ImageReady, the resolution of an image is always 72 ppi. This is because the ImageReady application is tailored to creating images for online media, not print media.
In Photoshop, image resolution and pixel dimensions are interdependent. The amount of detail in an image depends on its pixel dimensions, while the image resolution controls how much space the pixels are printed over. For example, you can modify an image's resolution without changing the actual pixel data in the image--all you change is the printed size of the image. However, if you want to maintain the same output dimensions, changing the image's resolution requires a change in the total number of pixels.
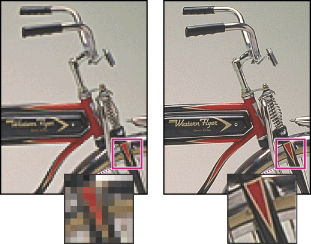
Example of an image at 72-ppi and 300-ppi
When printed, an image with a high resolution contains more, and therefore smaller, pixels than an image with a low resolution. For example, a 1-by-1-inch image with a resolution of 72 ppi contains a total of 5184 pixels (72 pixels wide x 72 pixels high = 5184). The same 1-by-1-inch image with a resolution of 300 ppi contains a total of 90,000 pixels. Higher-resolution images usually reproduce more detail and subtler color transitions than lower-resolution images. However, increasing the resolution of a low-resolution image only spreads the original pixel information across a greater number of pixels; it rarely improves image quality.
Using too low a resolution for a printed image results in pixelation--output with large, coarse-looking pixels. Using too high a resolution (pixels smaller than the output device can produce) increases the file size and slows the printing of the image; furthermore, the device will be unable to reproduce the extra detail provided by the higher resolution image.
Monitor resolution
The number of pixels or dots displayed per unit of length on the monitor, usually measured in dots per inch (dpi). Monitor resolution depends on the size of the monitor plus its pixel setting. Most new monitors have a resolution of about 96 dpi, while older Mac OS monitors have a resolution of 72 dpi.
Understanding monitor resolution helps explain why the display size of an image on-screen often differs from its printed size. Image pixels are translated directly into monitor pixels. This means that when the image resolution is higher than the monitor resolution, the image appears larger on-screen than its specified print dimensions. For example, when you display a 1-by-1 inch, 144-ppi image on a 72-dpi monitor, it appears in a 2-by-2 inch area on-screen. Because the monitor can display only 72 pixels per inch, it needs 2 inches to display the 144 pixels that make up one edge of the image.
Printer resolution
The number of ink dots per inch (dpi) produced by all laser printers, including imagesetters. Most desktop laser printers have a resolution of 600 dpi, and imagesetters have a resolution of 1200 dpi or higher. To determine the appropriate resolution for your image when printing to any laser printer, but especially to imagesetters, see "screen frequency."
Ink jet printers produce a microscopic spray of ink, not actual dots; however, most ink jet printers have an approximate resolution of 300 to 720 dpi. To determine your printer's optimal resolution, check your printer documentation.
Screen frequency
The number of printer dots or halftone cells per inch used to print grayscale images or color separations. Also known as screen ruling or line screen, screen frequency is measured in lines per inch (lpi)--or lines of cells per inch in a halftone screen.
The relationship between image resolution and screen frequency determines the quality of detail in the printed image. To produce a halftone image of the highest quality, you generally use an image resolution that is from 1.5 to at most 2 times the screen frequency. But with some images and output devices, a lower resolution can produce good results. To determine your printer's screen frequency, check your printer documentation or consult your service provider.
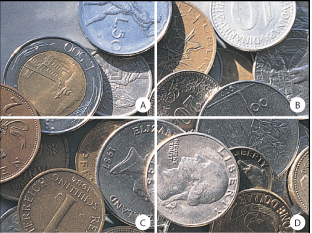
Screen frequency examples: A. 65 lpi: Coarse screen typically used to print newsletters and grocery coupons B. 85 lpi: Average screen typically used to print newspapers C. 133 lpi: High-quality screen typically used to print four-color magazines D. 177 lpi: Very fine screen typically used for annual reports and images in art books.
File size
The digital size of an image, measured in kilobytes (K), megabytes (MB), or gigabytes (GB). File size is proportional to the pixel dimensions of the image. Images with more pixels may produce more detail at a given printed size, but they require more disk space to store and may be slower to edit and print. For instance, a 1-by-1-inch, 200-ppi image contains four times as many pixels as a 1-by-1-inch, 100-ppi image and so has four times the file size. Image resolution thus becomes a compromise between image quality (capturing all the data you need) and file size.
Another factor that affects file size is file format--due to varying compression methods used by GIF, JPEG, and PNG file formats, file sizes can vary considerably for the same pixel dimensions. Similarly, color bit-depth and the number of layers and channels in an image affect file size. Photoshop supports a maximum file size of 2 GB and maximum pixel dimensions of 30,000 by 30,000 pixels per image. This restriction places limits on the print size and resolution available to an image.

