Pages

Showing posts with label Tutorials. Show all posts

Learn What is resampling

Resampling refers to changing the pixel dimensions (and therefore display size) of an image. When you downsample (or decrease the number of pixels), information is deleted from the image. When you resample up (or increase the number of pixels), new pixels are added based on color values of existing pixels. You specify an interpolation method to determine how pixels are added or deleted.

Resampling examples: A. Downsampled B. Original C. Resampled up (Selected pixels displayed for each image) 

Keep in mind that resampling can result in poorer image quality. For example, when you resample an image to larger pixel dimensions, the image will lose some detail and sharpness. Applying the Unsharp Mask filter to a resampled image can help refocus the image's details.  

You can avoid the need for resampling by scanning or creating the image at a high enough resolution. If you want to preview the effects of changing pixel dimensions on-screen or print proofs at different resolutions, resample a duplicate of your file.

Using the Info palette in Photoshop

The Info palette displays information about the color values beneath the pointer and, depending on the tool in use, other useful measurements.

To display the Info palette:
    Choose Window > Info.
    The Info palette displays the following information:
    • When displaying CMYK values, the Info palette displays an exclamation point next to the CMYK values if the color beneath the pointer or color sampler is out of the printable CMYK color gamut.
    • When you use the marquee tool, the Info palette displays the x- and y-coordinates of the pointer position and the width (W) and height (H) of the marquee as you drag.
    • When you use the crop tool or zoom tool, the Info palette displays the width (W) and height (H) of the marquee as you drag. The palette also shows the angle of rotation of the crop marquee.
    • When you use the line tool, pen tool, or gradient tool or when you move a selection, the Info palette displays the x- and y-coordinates of your starting position, the change in X (DX), the change in Y (DY), the angle (A), and the distance (D) as you drag.
    • When you use a two-dimensional transformation command, the Info palette displays the percentage change in width (W) and height (H), the angle of rotation (A), and the angle of horizontal skew (H) or vertical skew (V).
    • When you use any color adjustment dialog box (for example, Curves), the Info palette displays the before and after color values of the pixels beneath the pointer and beneath color samplers.

    (ImageReady) The Info palette displays the following information:
    • The RGB numeric values for the color beneath the pointer.
    • The Opacity value for the pixels beneath the pointer.
    • The hexadecimal value for the color beneath the pointer.
    • The index color table position for the color beneath the pointer.
    • The x- and y-coordinates of the pointer.
    • The x- and y-coordinates of your starting position (before you click in the image) and your ending position (as you drag in the image) when you use the marquee tool, the shape tools, the crop tool, and the slice tool.
    • The width (W) and height (H) of the selection as you drag when you use the crop tool, the shape tools, the slice tool, or the zoom tool.
    • The percentage change in width (W) and height (H), the angle of rotation (A), and the angle of horizontal skew (H) or vertical skew (V) when you use a Transform or Free Transform command.
To change the Info palette options:
  1. Choose Palette Options from the Info palette menu.
  2. For First Color Readout, choose one of the following display options:
    • Actual Color to display values in the current color mode of the image.
    • Total Ink to display the total percentage of all CMYK ink at the pointer's current location, based on the values set in the CMYK Setup dialog box.
    • Opacity to display the opacity of the current layer. This option does not apply to the background.
    • Any other option to display the color values in that color mode.
  3. For Second Color Readout, choose a display option listed in step 2.
  4. For Ruler Units, choose a unit of measurement.
  5. Click OK.
To change measurement units, click the cross-hair icon in the Info palette for a menu of options. To change color readout modes, click the eyedropper icon.

    About color modes and models in Photoshop

    A color mode determines the color model used to display and print images. Photoshop bases its color modes on established models for describing and reproducing color. Common models include HSB (hue, saturation, brightness); RGB (red, green, blue); CMYK (cyan, magenta, yellow, black); and CIE L*a*b*. Photoshop also includes modes for specialized color output such as Indexed Color and Duotone. ImageReady uses RGB mode to work with images.

    In addition to determining the number of colors that can be displayed in an image, color modes affect the number of channels and the file size of an image.

     You can set up the Info palette so that you can select any tool, position the pointer over any part of an image, and determine the color value under the pointer. You can customize the Info palette and color samplers to express color values using HSB, RGB, CMYK, Lab, or Grayscale modes without changing the mode of the image itself.and the procedure to change Info palette options in Using the Info palette (Photoshop).

    How To Delete Background From a Picture Using Photoshop

    This Tutorial is important for new comer in Photoshop. It is a very easy way to delete background from a picture using adobe Photoshop or adobe Photoshop cs. Get only fore stapes to delete background from a picture. That is-


     Step 1:Open your Photoshop>>Open a picture(As you like) or selected picture.


    Step 2: Now press Ctrl.+A and copy the picture.

     Step 3: Create anew file and paste the picture. Now you select Magic wand tool or press "W" key from your keyboard>>click on the background in the picture>>Menu-bar>>Select>>Father>>1px>>ok or you can use shortcut key "Ctrl+Alt+D" from keyboard.


      Step 4: Now you delete the background and save as the picture in "PNG" format for longer use. 

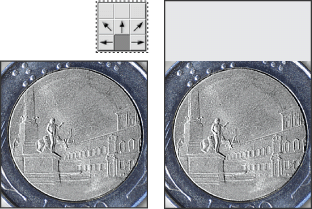
    How To Changing the size of the work canvas

    The Canvas Size command lets you add or remove work space around an existing image. You can crop an image by decreasing the canvas area. Added canvas appears in the same color or transparency as the background.

    To use the Canvas Size command:
    1. Choose Image > Canvas Size.
    2. (Photoshop) Choose the units of measurement you want.
    3. The Columns option measures width in terms of the columns specified in the Rulers & Units preferences.
    1. Do one of the following:
      • Enter the dimensions you want the canvas to be in the Width and Height boxes.
      • Select Relative, and enter the amount by which you want to increase or decrease the size of the canvas. (Enter a negative number to decrease the size of the canvas.)
    2. For Anchor, click a square to indicate where to position the existing image on the new canvas.
    3. Click OK.
    Original canvas, and canvas added to top of image

    Learn About bitmap images and vector graphics


    Computer graphics fall into two main categories--bitmap and vector. You can work with both types of graphics in Photoshop and ImageReady; moreover, a Photoshop file can contain both bitmap and vector data. Understanding the difference between the two categories helps as you create, edit, and import artwork.

    Bitmap images

    Bitmap images--technically called raster images--use a grid of colors known as pixels to represent images. Each pixel is assigned a specific location and color value. For example, a bicycle tire in a bitmap image is made up of a mosaic of pixels in that location. When working with bitmap images, you edit pixels rather than objects or shapes.

    Bitmap images are the most common electronic medium for continuous-tone images, such as photographs or digital paintings, because they can represent subtle gradations of shades and color. Bitmap images are resolution-dependent--that is, they contain a fixed number of pixels. As a result, they can lose detail and appear jagged if they are scaled on-screen or if they are printed at a lower resolution than they were created for. 
    Example of a bitmap image at different levels of magnification


    Vector graphics


    Vector graphics are made up of lines and curves defined by mathematical objects called vectors. Vectors describe an image according to its geometric characteristics. For example, a bicycle tire in a vector graphic is made up of a mathematical definition of a circle drawn with a certain radius, set at a specific location, and filled with a specific color. You can move, resize, or change the color of the tire without losing the quality of the graphic. 

    Vector graphics are resolution-independent--that is, they can be scaled to any size and printed at any resolution without losing detail or clarity. As a result, vector graphics are the best choice for representing bold graphics that must retain crisp lines when scaled to various sizes--for example, logos.
    Example of a vector graphic at different levels of magnification
     
    Because computer monitors represent images by displaying them on a grid, both vector and bitmap data is displayed as pixels on-screen.