Pages

Showing posts with label Photoshop Basic Tools. Show all posts

Specifying what to transform

You can apply transformations to a selection, an entire layer, multiple layers, or a layer mask. In Photoshop, you can also apply transformations to a path, a vector shape, a vector mask, a selection border, or an alpha channel.

Note: You cannot apply transformations to16 bit-per-channel images. You can, however, apply full canvas transformations to 16-bit images using the options in the Image menu.

To specify what to transform:
Do one of the following:
  • To transform an entire layer, make the layer active, and make sure nothing is selected.
Important: You cannot transform the background layer. However, you can convert a background layer to a regular layer.
  • To transform part of a layer, select the layer, and then select part of the image on that layer.
  • To transform multiple layers, link the layers together in the Layers palette.
  • To transform a layer mask or a vector mask, unlink the mask, and select the mask thumbnail in the Layers palette.
  • (Photoshop) To transform a path or vector shape, use the path selection tool  path selection tool to select the entire path or the direct selection tool direct selection tool to select part of the path. If you select one or more points on a path, only those path segments connected to the points are transformed.
  • (Photoshop) To transform a selection border, make or load a selection. Then choose Select > Transform Selection.
  • (Photoshop) To transform an alpha channel, select the channel in the Channels palette.

Transforming perspective while cropping in Photoshop

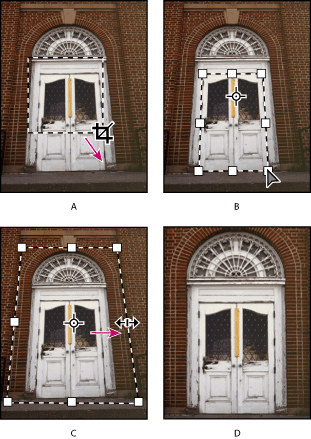
The crop tool in Photoshop has an additional option that allows you to transform the perspective in an image. This is very useful when working with images that contain keystone distortion. Keystone distortion occurs when an object is photographed from an angle rather than from a straight-on view. For example, if you take a picture of a a tall building from ground level, the edges of the building appear closer at the top than they do at the bottom.

Note: You cannot transform the perspective of 16-bit-per-channel images.
 Steps to transform perspective: A. Draw initial cropping marquee B. Adjust cropping marquee to match the object's edges C. Extend the cropping bounds D. Final image

To transform the perspective in an image:
  1. Select the cropcrop tool tool and set the crop mode.
  2. Drag the cropping marquee around an object that was rectangular in the original scene (although it doesn't appear rectangular in the image). You'll use the edges of this object to define the perspective in the image. The marquee doesn't have to be precise--you'll adjust it later.
  3. Important: You must select an object that was rectangular in the original scene or Photoshop will not be able to transform the perspective in the image.
  4. Select Perspective in the options bar, and set the other options as desired.
  5. Move the corner handles of the cropping marquee to match the object's edges. This defines the perspective in the image, so it is important to precisely match the object's edges.
  6. Drag the side handles to extend the cropping bounds while preserving the perspective.
  7. Important: Do not move the center point of the cropping marquee. Photoshop needs to know the original center point of the image in order to perform perspective correction.
  8. Do one of the following:
    • Press Enter (Windows) or Return (Mac OS); click the Commit button OK button in the options bar; or double-click inside the cropping marquee.
    • To cancel the cropping operation, press Esc or click the Cancel button Cancel button in the options bar.
If Photoshop displays an error, it is probably due to improper placement of the corner handles or center point. Click Cancel to go back and adjust the cropping marquee; click Don't Crop to cancel the cropping operation. An error may also occur if you're working with a previously cropped image.

    How To Making Color Adjustments In Photoshop


    There are two ways to adjust the colors in an image. The first method is to choose a command from the Image > Adjustments submenu. This method permanently alters the pixels in the active layer.

    The second method is to use an adjustment layer. Adjustment layers let you experiment with color and tonal adjustments without permanently modifying the pixels in the image. The color and tonal changes reside within the adjustment layer, which acts as a veil through which the underlying image layers appear. You must use Photoshop to create and edit adjustment layers; however, you can view existing adjustment layers in ImageReady. 

    To open a color adjustment dialog box:
    1. If you want to make adjustments to just a portion of your image, select that portion. If you make no selection, the adjustment will be applied to the entire image.
    1. Do one of the following:
    ·         Choose Image > Adjustments, and choose a command from the submenu.
    ·         (Photoshop) Create an adjustment layer.
    ·         (Photoshop) Double-click the thumbnail of an existing adjustment layer in the Layers palette.

    To see your adjustments in the image before accepting them, select Preview in the color adjustment dialog box. 

    ### To cancel changes without closing a color adjustment dialog box, hold down Alt (Windows) or Option (Mac OS) to change the Cancel button to Reset; then click Reset. This resets the dialog box to the values it had prior to your changes.

    How to Using the art history brush tool in Photoshop

    The art history brush tool lets you paint with stylized strokes, using the source data from a specified history state or snapshot. By experimenting with different paint style, size, and tolerance options, you can simulate the texture of painting with different colors and artistic styles.

    Like the history brush, the art history brush uses a specified history state or snapshot as the source data. The history brush, however, paints by recreating the specified source data, while the art history brush uses that data along with the options you set to create different colors and artistic styles.

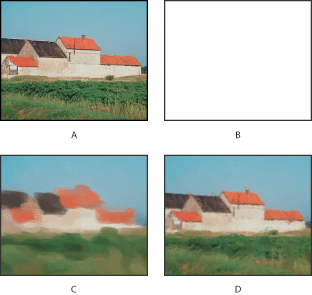
    For a variety of visual effects, experiment with applying filters or filling an image with a solid color before painting with the art history brush tool. Also try increasing the size of the image by a factor of 4 to soften the details.

    Example of using the art history brush tool: A. Original B. White fill C. Large brush D. Small brush To use the art history brush tool:


    1. In the History palette, click the left column of the state or snapshot to use as the source for the art history brush tool. A brush icon appears next to the source history state.
    1. Select the art history brush tool .
    1. Do the following in the options bar:
    ·         Choose a brush and set brush options. (See Working with brushes.)
    ·         Specify a blending mode and opacity for the paint. (See Setting options for painting and editing tools.)
    ·         Choose an option from the Style menu to control the shape of the paint stroke.
    ·         For Area, enter a value to specify the area covered by the paint strokes. The greater the size, the larger the covered area and more numerous the strokes.
    ·         For Tolerance, enter a value or drag the slider to limit the regions where paint strokes can be applied. A low tolerance lets you paint unlimited strokes anywhere in the image. A high tolerance limits paint strokes to areas that differ considerably from the color in the source state or snapshot.
    Drag in the image to paint.


    How to Using plug-in modules in Photoshop


    Plug-in modules are software programs developed by Adobe Systems and by other software developers in conjunction with Adobe Systems to add features to Photoshop and ImageReady. A number of importing, exporting, and special-effects plug-ins come with your program; they are automatically installed in folders inside the Photoshop Plug-ins folder.
    You can select an additional plug-ins folder to use compatible plug-ins stored with another application. You can also create a shortcut (Windows) or an alias (Mac OS) for a plug-in stored in another folder on your system. You can then add the shortcut or alias to the Plug-ins folder to use that plug-in with Photoshop and ImageReady.
    Once installed, plug-in modules appear as options added to the Import or Export menu; as file formats in the Open, Save As, and Export Original (ImageReady) dialog boxes; or as filters in the Filter submenus. Photoshop and ImageReady can accommodate a large number of plug-ins. However, if the number of installed plug-in modules becomes great enough, Photoshop or ImageReady may not be able to list all the plug-ins in their appropriate menus. Newly installed plug-ins will then appear in the Filter > Other submenu.
    To install an Adobe Systems plug-in module:
    Do one of the following:
      • Use the plug-in installer, if provided.
      • (Windows) Copy the module into the appropriate Plug-ins folder in the Photoshop program folder. Make sure that the files are uncompressed.
      • (Mac OS) Drag a copy of the module to the appropriate Plug-ins folder in the Photoshop program folder. Make sure that the files are uncompressed.
    Important: For Macintosh, the plug-ins that come with Photoshop 7.0 are compatible with both Mac OS 9.x and Mac OS X. However, any plug-in originally intended to work on Mac OS 9, such as plug-ins from previous versions of Photoshop and some third-party plug-ins, can only be used on Mac OS 9.x or in the Classic environment on Mac OS X. You can place such plug-ins in the Plug-ins folder for the Mac OS X version of Photoshop, but they will not appear unless you launch Photoshop in the Classic environment.
    To install a third-party plug-in module:
    Follow the installation instructions that came with the plug-in module.
    If you cannot run a third-party plug-in, the plug-in may require a legacy Photoshop serial number.
    To specify a legacy serial number (Photoshop):
    1. Do one of the following:
    ·         In Windows and Mac OS 9.x, choose Edit > Preferences > Plug-Ins & Scratch Disk.
    ·         In Mac OS X, choose Photoshop > Preferences > Plug-Ins & Scratch Disk.
                            Enter the serial number from Photoshop 6.0 or earlier in the Legacy Photoshop Serial Number text box.
    To select an additional plug-ins folder:
    1. Do one of the following:
    ·         In Windows and Mac OS 9.x, choose Edit > Preferences > Plug-Ins & Scratch Disk.
    ·         (Photoshop) In Mac OS X, choose Photoshop > Preferences > Plug-Ins & Scratch Disk.
    ·         (ImageReady) In Mac OS X, choose ImageReady > Preferences > Plug-Ins & Scratch Disk.
                            Select Additional Plug-ins Folder.
                            Click Choose, and select a folder or directory from the list. Make sure that you do not select a location inside the Plug-ins folder. To display the contents of a folder, double-click the directory (Windows) or click Open (Mac OS).
                            When you have highlighted the additional plug-ins folder, click OK (Windows), Select (Mac OS) or Choose (Mac OS 9.0 and later).
                            Restart Photoshop or ImageReady for the plug-ins to take effect.
    To suppress the loading of a plug-in or folder of plug-ins:
    Add a tilde "~" character at the beginning of the plug-in name, folder, or directory. That file (or all files in the folder) will be ignored by the application.
    To view information about installed plug-ins:
    Do one of the following:
      • In Windows, choose Help > About Plug-In and select a plug-in from the submenu.
      • In Mac OS 9.x, choose Apple menu > About Plug-In and select a plug-in from the submenu.
      • (Photoshop) In Mac OS X, choose Photoshop > About Plug-In and select a plug-in from the submenu.
      • (ImageReady) In Mac OS X, choose ImageReady > About Plug-In and select a plug-in from the submenu.
    To load a plug-in in only Photoshop or ImageReady:
    Install the plug-in either the Adobe Photoshop Only folder or the Adobe ImageReady Only folder inside the Plug-ins folder.
    Note: Use this procedure when you want to use a plug-in within only Photoshop or ImageReady, or when a plug-in may only be compatible with one of the two applications.